

How To Set Up Nest Doorbell Camera
How to Install a Google Nest Hullo Doorbell
See who's knocking on your door — the smart manner.
![]() Time
Time
An hr or less
![]() Complexity
Complexity
Intermediate
![]() Cost
Cost
$101–250
Introduction
Nosotros'll accept you footstep-by-step through replacing your button doorbell with Google Nest Hello camera doorbell and setting up the Nest Home app.
Tools Required
Materials Required
- Google Nest Hello
Project step-by-step (fourteen)
Step 1
Compatibility Check
- Virtually wired doorbells can exist replaced by the Google Nest Howdy Video Doorbell. Merely first, it's essential to bank check if your current doorbell is compatible with Google Nest Hello.
- Ring your doorbell to locate your chime box.
- Remove the cover and look inside. What kind of doorbell chinkle exercise you have?
- An electronic chinkle has batteries and wires, which are compatible with Google Nest Hello.
- A mechanical chinkle has merely wires, likewise uniform with Google Nest Hello.
- A wireless chinkle with batteries and NO wires is NOT Uniform with Google Nest Hello unless you purchase a ability adapter.

- Locate the transformer
- The wires leading out of your chime box connect to the transformer.
- Look for the transformer in the basement, the attic, or around the circuit billow box.
- Check the transformer voltage
- The voltage rating is printed on the transformer.
- Google Nest Hi doorbell requires transformer voltage betwixt 16 and 24 volts AC.
- Pro tip: Do the compatibility check earlier purchasing the Google Nest Hello.
Please be careful in this step. Electrical currents are present. Practice NOT touch any wires!

Pace 2
Sign In to Nest
- Sign in to your Nest app or create a new account by going to Apple tree App Store or Google Play to download the Nest app.

![]()
Pace 3
Add Production & Scan the QR Lawmaking
- In the Nest app touch on the + sign to add together the production to your app.
- Scan the QR code located on the dorsum of the Google Nest How-do-you-do with your phone or tablet's camera.
- Note: There is a QR code on the envelope in the box as well.


Step 4
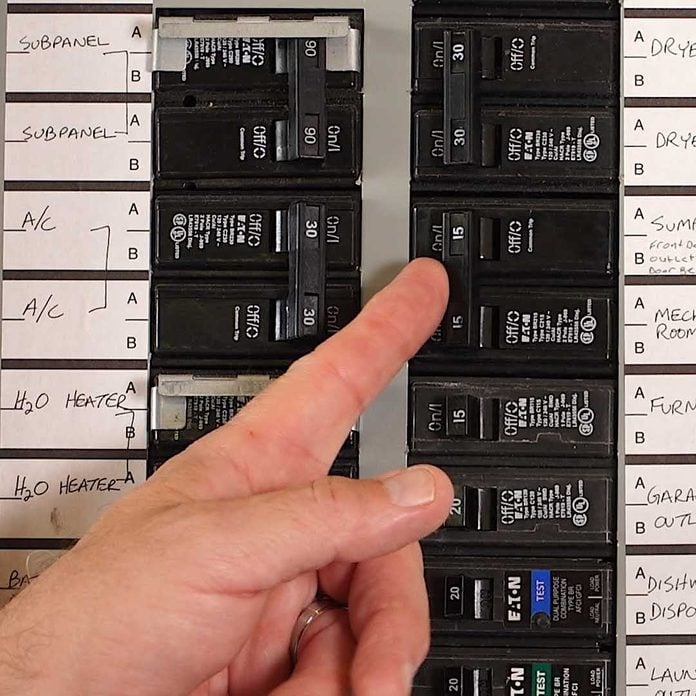
Cut the Power
- Turn off the ability to your doorbell and chime at your domicile'southward billow box.
Stride 5
Chime Terminals & Labels
- Your doorbell chinkle may have terminals that are labeled Forepart, REAR, and TRANS.
- Front end is for your forepart doorbell.
- REAR is for the back doorbell.
- TRANS is for the transformer.
- Alter out the terminal for the doorbell you are replacing.
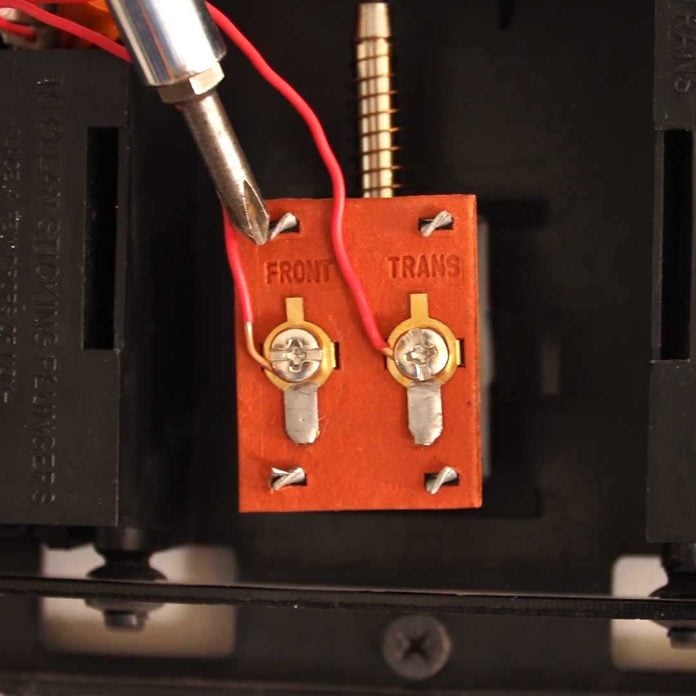
Step half dozen
Disconnect Front end Wire
- Disconnect the Front wire from the terminal on the chinkle.
- Straighten the wire and trim it so you run into ane/four-in of bare wire.


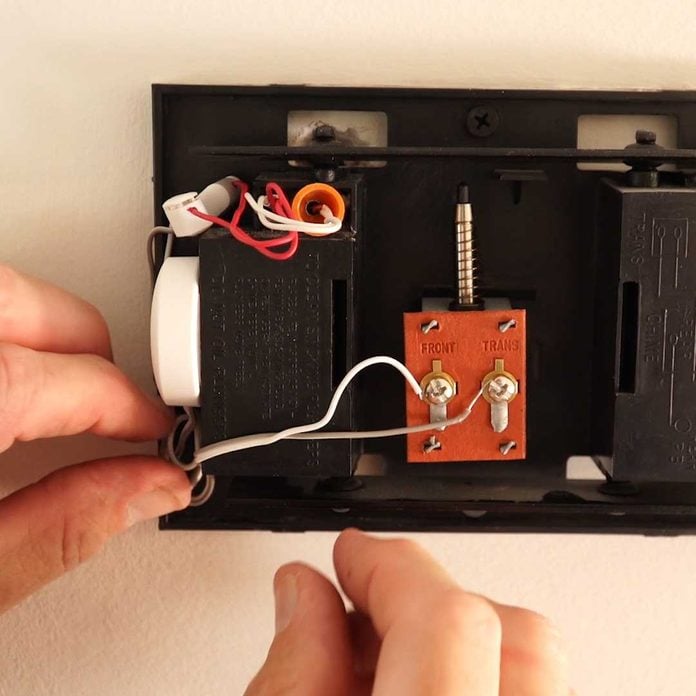
Step 7
Attach Front Wire
- Compression the plastic clip and insert the Front wire into the clip on the chinkle connector's WHITE wire.
- Connect the chime connector's WHITE wire to the terminal on your doorbell chime labeled FRONT.


Step 8
Disconnect Trans Wire
- Disconnect the TRANS wire from the final on the chinkle.
- Straighten the wire and trim information technology then you see ane/4-in of blank wire.
- Pinch the plastic clip and insert the TRANS wire into the prune on the chinkle connector'due south GRAY wire.
- Connect the chinkle connector's GRAY wire to the last on your doorbell chinkle labeled TRANS.


Step nine
Adhere the Chinkle Connector
- Find a adept place to stick the chime connector, making sure the wires don't interfere with the chimes.
- Notation: You may have to put the chime connector exterior the chime box.
Pace x
Remove the Old Doorbell
- Unscrew the two screws and remove the old doorbell.
- Disconnect the wires from the back of the doorbell.
- Bend or tape the wires and then they don't fall dorsum into the hole.

Step xi
Install the Wall Plate
- Pull your wires through the center pigsty of the wall plate.
- Position the wall plate so the wires come through the bottom one-half of the wall plate hole.
- Annotation: If the wires don't come through, they can forestall Google Nest Hello from locking onto the wall plate.
- Mark the screw holes through the wall plate, making sure the Nest logo is at the bottom.
- Drill ii 3/32-in pilot holes at your marks.
- Pro tip: If drilling into brick or stucco, use the included masonry bit.
- Attach the wall plate using the two screws provided. The lesser horizontal screw hole enables you to straighten the wall plate.


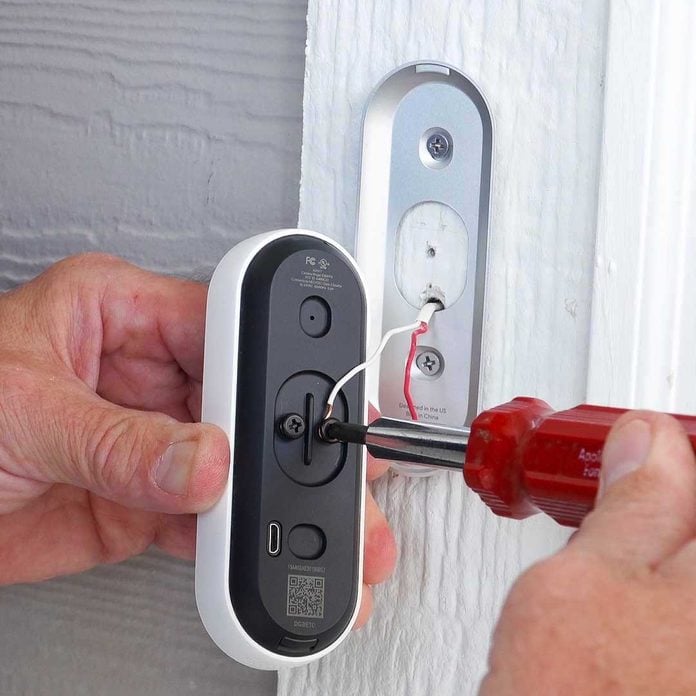
Step 12
Install Google Nest Hello
- Connect the 2 wires to the screw terminals on the back of the Google Nest Hi, pointing the wires down and pushing any excess wire back into the hole.
- Attach the doorbell to the wall plate by sliding the peak of the doorbell into the plate, then click it into the bottom of the plate.
- Y'all can remove the Google Nest How-do-you-do doorbell by using the tool included.
- You can change the angle of the Google Nest Hello camera past using the included wedge.

Stride 13
Power Up
- Switch the power back on at the breaker box.
- The Google Nest Hello should have a bluish ring effectually the doorbell push button.

Footstep fourteen
Connection to WiFi
- Tell the Nest app where you installed the Google Nest Howdy doorbell (i.e., front door, back door, etc.).
- Select your WiFi network and enter your password.
- Note: If you already have a Nest production installed in your home, Google Nest Hello will attempt to connect to your WiFi from information technology.
- Google Nest Hello should connect to your WiFi.


Exam the App
- Test the app by ringing the doorbell to check that your doorbell chinkle is working.
- Note: You lot should also get a notification from the app that someone's at your door.

Originally Published: September 18, 2020
Source: https://www.familyhandyman.com/project/how-to-install-google-nest-hello-doorbell/
Posted by: baumanatten1980.blogspot.com
0 Response to "How To Set Up Nest Doorbell Camera"
Post a Comment